This post may contain affiliate links. For more information, read my disclosure policy.

Twilight changed my life.
I know there are two camps of people out there; one of which just took a double take at those words and thought “that lady is crazy!” The other half? Nodded their heads in agreement. Am I right?
Something about that series of books changed the way I read. It changed what I read. I didn’t think it was possible but those books made me want to read even more than I already did.
They made me feel like a 13-year old again, pining away for Joey McIntyre…except now I’m a thirty-something mom and wife pining over a sparkly vampire.
And the only difference between me and those teeny-bopper girls in the movie theater who scream and swoon every time Jacob removes his shirt? I’m adult enough to to let the sound escape my lips.
Needless to say, the release of the first Breaking Dawn movie is a big deal. I already have my ticket, and I’m not going until Sunday.
And you can’t see such a monumental movie without a themed treat, right?
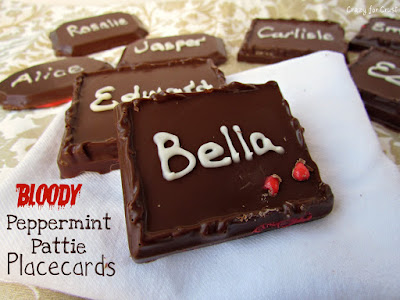
Bella and Edward has such a beautiful wedding. I’m sure there was some sort of seating chart; Alice seems like that sort of type-A person. Why shouldn’t the place cards be chocolate?
When I realized that Karen at Trilogy Edibles has as big an obsession with the Twilight series that I do, it was a no brainer that we would do themed posts today. Karen has made a beautiful checkerboard cake with browned butter icing and little chess pieces. She’s a master, if I do say so myself. I thought about doing chess pieces for about a millisecond before I moved on to other ideas.
My mold came from Sur la Table. These are so easy to make. Once you have your filling mixed, you melt your chocolate. Spread some around the bottom and up the sides of your mold, freeze to harden, then add a little peppermint mixture. Freeze again for just a few minutes, then top it off with more chocolate. Once they are firm you can release them from the mold and add names to the front.
{FYI, Peppermint Extract looks eerily like Mint Extract. But don’t make the same mistake I did. You want peppermint extract, NOT mint. Unless you want to eat chocolate covered gum flavor, that is.}
And if you happen to be serving humans and werewolves instead of vampires, or if you think I’m totally crazy for making movie-themed treats and want a non-bloody version, you can use a mini muffin pan (silicone) and leave your filling white. Just as good, not as gross.
So yes, I know the Cullen’s don’t eat food. But if that food was filled with blood? I bet they’d make an exception.
If you love the Twilight series and are as excited about the Breaking Dawn movie as we are, be sure to go check out Karen’s post. It’s Cullen mania around here. My shirt is already to go. Team Edward forever!

Recipe by Crazy for Crust
Ingredients:
1 can sweetened condensed milk
3 cups powdered sugar (more if you want a less runny center)
1/2 teaspoon Peppermint extract
1-2 packages chocolate almond bark (buy 2 just in case, start with melting 1 package and add more as needed) or you could use chocolate candy melts
White candy melts (just about 1/4 cup)
Directions:
- Add sweetened condensed milk to a large bowl. Slowly stir in the powdered sugar, 1 cup at a time, until thoroughly mixed. Stir in extract.
- Melt chocolate according to package directions. Add a small spoonful to your mold or mini muffin pan (if you are not using a silicone pan you should use mini muffin liners). Spread chocolate up sides of mold. Tap to settle. Freeze until hardened, about 2 minutes.
- Spoon a small amount of peppermint filling into center of chocolate shell. Freeze again for about 1-2 minutes. Remove from freezer and top with more chocolate, enough to cover filling. Tap to settle and freeze until hardened. Pop out of mold and repeat until all your chocolate and filling are gone.
- If you are making place cards, melt white candy melts according to package directions. Place in a small squeeze bottle with a #2 tip attached. Pipe names on each candy. Let dry before stacking.
Note: if you want a less runny center, add more powdered sugar in step 1, until you get the consistency you want.
Have a sparkly weekend!
What a clever and tasty idea!